
GRIZZLE
Design by ViDerTextil© Viviane Deroover
BERET
 |
| Grizzle by ViDerTextil© |
Material:
100% natural wool - Kauni -8/2
effektyarn EC - 400m for 100gr, which
can be beautifully felted. Of course you can knit in any other non-superwash
yarn
Circular knitting needles or set of 4/5 double pointed needles n°4,5mm. You need an open and not too tight knitted result because it’s felted afterwards - You’ll need also needle n° 4mm for the border.
Circular knitting needles or set of 4/5 double pointed needles n°4,5mm. You need an open and not too tight knitted result because it’s felted afterwards - You’ll need also needle n° 4mm for the border.
The whole
beret is knit in one piece, in round, top -> down
Fournitures:
100% laine naturelle - Kauni -8/2 EffektYarn EC - 400m pour 100gr, une laine qui feutre. Vous
pouvez aussi tricoter dans une autre laine, pour autant qu’elle ne soit pas superwash.
Aiguilles à tricoter circulaires ou un jeu de 4/5 aiguilles à double pointes n°4,5mm. Il faut un résultat assez ouvert, parce qu’une fois feutré, cela rétrécit et les mailles se referment sur les trous-ouvertures. Il vous faut aussi des aiguilles n°4mm pour la bordure.
Anneaux marqueurs.
Aiguilles à tricoter circulaires ou un jeu de 4/5 aiguilles à double pointes n°4,5mm. Il faut un résultat assez ouvert, parce qu’une fois feutré, cela rétrécit et les mailles se referment sur les trous-ouvertures. Il vous faut aussi des aiguilles n°4mm pour la bordure.
Anneaux marqueurs.
Le béret est
tricoté en une pièce, du haut (le centre) vers le bas (la bordure), top ->
down
More...Plus...
More...Plus...
Abbreviations


 |
| Grizzle by ViDerTextil© |
Chart is designed
with only uneven rows (read from right to left). Even rows: knit the stitches as
you see them: so, if you see purl stitch on the left needle, then purl it, if
you see knit stitch, then knit – the increases made by yarnover or make1 are purl.
The rectangle colored in orange is the smaller chart in orange on the left.
The rectangle colored in orange is the smaller chart in orange on the left.
Let’s start
Cast on 10
stitches (needles n° 4,5mm) with a magic ring (you can do it on crochet first
or immediately on needles (https://www.youtube.com/watch?v=0gK7yn-M7Yg is a video explaining both techniques)
Then start with row 1 from following chart.
Repeat the design 10 times. Place marker at the beginning of a row and at each
start of a repeat of the chart-design (
it’s easier this way to find an error J ).
Uniquement les
rangs impairs sont mentionnés dans les diagrammes (à lire de droite vers la
gauche). Tricoter les mailles comme elles se présentent dans les rangs pairs.
Les jetés et augmentations se tricotent à l’envers.
Le rectangle orange dans le diagramme représente la partie du diagramme à gauche en orange.
Le rectangle orange dans le diagramme représente la partie du diagramme à gauche en orange.
Réalisation
Monter 10 mailles
(aig. N°4,5mm) avec un anneau magique (retrouvez la méthode au crochet et aux
aiguilles dans cette vidéo : https://www.youtube.com/watch?v=0gK7yn-M7Yg.
Commencez par rang 1 du diagramme ci-dessous. Répétez
le motif 10 fois. Placez un anneau marqueur après chaque motif et un diffèrent
pour marquer le début de chaque tour.

After row
24 - Go to following chart
AS information you have row 23 repeated under first row 25, so you see that the knit1 is the stitch upon the decrease. Don’t forget to make the increases (make1) as indicated!.
The empty place between the last purl and the nup of row 27 means nothing. It’s only to keep the visual of the leaf intact that I moved it slightly to the left. From row 29 I only marked the arrow-signs to indicate that you need to purl until the leaf. Thus the arows left and right are replacing the signs of purl. After row 41 you’ll have 10 purls on each side of your center knit stitch.
Prenez le diagramme
suivant après le rang 24
pour information le rang 23 es répété en dessous du rang 25 afin de vous montrer que la m.endr. se retrouve au-dessous de la diminution.
N’oubliez pas les augmentations comme indiqué.
L’espace vide entre la dernière m.env. et la noppe du rang 27, n’indique rien. Elle y est pour garder le visuel de la feuille.
A partir du rang 29 vous faites des m.env. entre la m.endr. et la feuille. Les indications fléchées remplacent le sigle des m.env.. Après le rang 41 vous aurez 10 m.env. de chaque côté de votre m.endr.centrale.

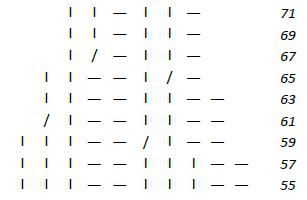
Row
42 : purl
Rows 43 44 46 48 49 52 53 54 = knit
Rows 45 47 50 51 : purl
Rows 43 44 46 48 49 52 53 54 = knit
Rows 45 47 50 51 : purl
Row 55
starts with border and knitting needles n°4mm
as below : decreases are made to tighten up.
Rang 42 : envers
Rangs 43 44 46 48 49 52 53 54 : endroit
Rangs 45 47 50 51 : envers
Rangs 43 44 46 48 49 52 53 54 : endroit
Rangs 45 47 50 51 : envers
Rang 55 commencer
la bordure avec aiguilles n°4mm et suivre le diagramme ci-dessous. Les
diminutions vont resserrer le bord.
After row
71 = bind off
Block your
beret – measure and then felt until you have desired size. As long as it’s wet,
you can adapt the size. Take hot water with normal soap (no Eucalan or Soak!!)
for felting.
Après rang 71,
rabattre toutes les mailles ;
Faites la mise en
forme de votre béret (blocage), mesurez la taille et la taille qu’il faut
finalement obtenir. Commencez à feutrer avec de l’eau chaude et un savon (pas
de produit doux pour lainages, ou Eucalan-Soak sinon vous ne feutrez
pas !)
 |
| Grizzle by ViDerTextil© |
Merci pour ce beau modele et les explications bien détaillées qui doivent permettre d'arriver à le faire!!!
RépondreSupprimerC'est un chouette cadeau de Noel!!!
AnnieTC